# Set up and run Stable Diffusion yourself - in two minutes
There are several websites that let you use Stable Diffusion to generate pictures with just a text prompt. [Stable Diffusion Online](https://stablediffusionweb.com/)
is one example. However, they either charge you money, have a long waiting list, or offer a very limited number of options (e.g., for the image size).
Did you know that you can set up and run your own version of Stable Diffusion in just two minutes? All you need is a Google account and you are good to go.
> ### Using Colab: TLDR;
 I will explain the code below, but if you are not interested in the details, all you need is to go [here](https://github.com/mflechl/colab-genai-simple/blob/main/stable-diffusion-2.1.ipynb) and click on the little symbol *Open in Colab* somewhere in the middle of the screen. If asked, log into your Google account and a
notebook will open in the Google Colab environment.
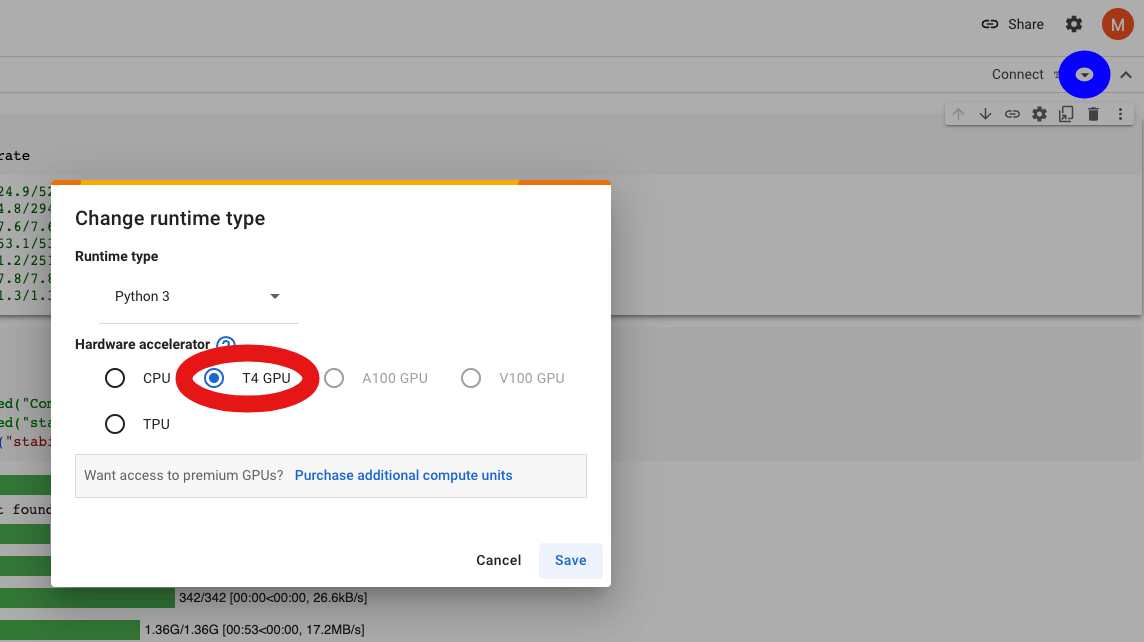
Now you need to click on the tiny downward-facing arrow in the upper right of the window (blue circle in the screenshot),
choose *Change runtime type* and then select the most powerful GPU you have
access to - for a free account, at the time of writing this is likely a *T4 GPU* (red circle). Then click *Save*. All that is left to be done is either
select ```Runtime -> Run all``` or click the
little *Play* arrows to the left of the code pieces to run them, one by one. That's it!
> ### A closer look at the code in the notebook
The first few lines install a few necessary python modules (packaged pieces of code that we can use, in this case publicly available):
```py
!pip -q install diffusers==0.11.1
!pip -q install transformers scipy ftfy accelerate
```
I will explain the code below, but if you are not interested in the details, all you need is to go [here](https://github.com/mflechl/colab-genai-simple/blob/main/stable-diffusion-2.1.ipynb) and click on the little symbol *Open in Colab* somewhere in the middle of the screen. If asked, log into your Google account and a
notebook will open in the Google Colab environment.
Now you need to click on the tiny downward-facing arrow in the upper right of the window (blue circle in the screenshot),
choose *Change runtime type* and then select the most powerful GPU you have
access to - for a free account, at the time of writing this is likely a *T4 GPU* (red circle). Then click *Save*. All that is left to be done is either
select ```Runtime -> Run all``` or click the
little *Play* arrows to the left of the code pieces to run them, one by one. That's it!
> ### A closer look at the code in the notebook
The first few lines install a few necessary python modules (packaged pieces of code that we can use, in this case publicly available):
```py
!pip -q install diffusers==0.11.1
!pip -q install transformers scipy ftfy accelerate
```
Then, we set up everything. We import (i.e., load) a few modules. Some of them are already present on the Colab Python installation, some of them we installed above.
We also create a specific pipeline (chain of commands) which allows us to conveniently talk to a Stable Diffusion model. While doing so, we also specify the specific
model we will be using: Stable Diffusion 2.1 from [stability.ai](https://www.stability.ai).
More powerful models are available, however, there is insufficient RAM available on
the free Colab nodes to use them. The last line tells the pipe to run on the GPU instead of the CPU:
```py
import torch
from diffusers import StableDiffusionPipeline
pipe = StableDiffusionPipeline.from_pretrained("stabilityai/stable-diffusion-2-1", torch_dtype=torch.float16)
pipe = pipe.to("cuda")
```
Next we set up a random number generator with a fixed seed so that for the same input we always get the same image.
You can remove it (and ```, generator=generator``` a few lines below) if you do not want that.
Then, the big moment: the prompt. Feel free to play around with it in any way you like. The number of steps (```num_steps```)
loosely speaking defines how often the algorithm iterates to generate the image: the higher the better results you get, but it takes longer and after a certain
number of steps the result will not change much anymore. Then we define height and width of the image - you cannot go very large before running out of memory
on free-tier Colab. And finally, we generate the image!
```py
generator = torch.Generator("cuda").manual_seed(42) # set seed for reproducible results
prompt = "a painting of a monkey on mars in a spacesuit eating a banana in the style of Dalí"
num_steps=50
height=512
width=768
image = pipe(prompt, num_inference_steps=num_steps, height=height, width=width, generator=generator).images[0]
```
To display the image on Colab, all it takes is the line ```image``` and you can then right-click on it to save it. If you run the code somewhere else,
```image.save(f"monkey_on_mars.png")``` will do the trick.
> ### Troubleshooting
You can run this code yourself on Colab and save it on your gDrive to keep your modifications. In some cases, the image generation on Colab will fail due to
insufficient memory. In this case, the best strategy seems to be to disconnect the runtime and start again from the top (connect a GPU and run all lines).
Of course, you can run this code on any machine with a GPU with sufficient RAM, like even some laptops provide. If the RAM is insufficient, you can also
try decreasing the image size. If you run locally, it is likely that you will need to install some additional modules which are already pre-installed on
Colab. Enjoy!